AzureRM tasks in PowerShell Automation using Azure AD Principal - Part Two
In Part 1 we had covered the topics of understanding Azure Service Principals and how to create them. In this part we will look at using the Service Principals in a secure manner when creating Azure Automation Runbooks and carrying out AzureRM tasks.
We will not get into the details of how to create a automation account in Azure. It is very simple to follow the Microsoft Docs to create an automation account and also learn how to create a runbook and schedule it.
We will now focus on the how-to of using an Azure Service Principal in our PowerShell script.
In this example we will use the Password-based Service Principal for simplicity. Maybe I'll create another post for the certificate based service principal in a later update.
Note: The Service Principal can be used as any other account in Azure. So, you can use it with RBAC across Resource Groups/Resources as might be necessary.
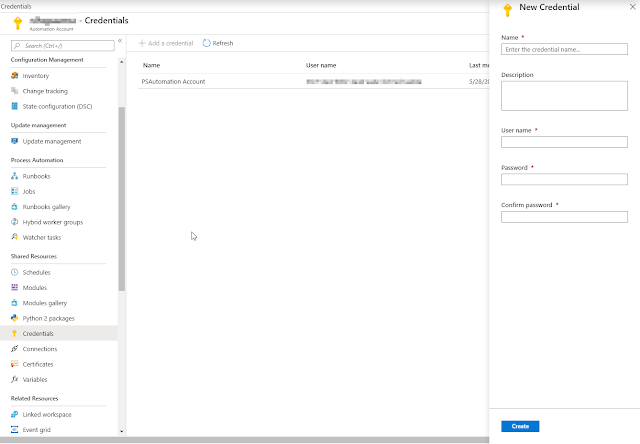
Go to your Automation Account resource and scroll down to find "Credentials" in the left bar. Use the "Add a credential" option to create a new credential in the credential store. Fill in the fields as required. The username is the ID of your service principal and the password is the same what you set during the service principal creation.
You now have your Service Principal credentials stored securely in the Credential Store.
Now, the next step is using this inside your PowerShell script. Now it is important to note the name that we used when creating the credential in the Credential Store.
Here is a sample PowerShell that gets all Resource Groups that the Service Principal has access to.
Of course, this can easily be extended to more complex scripts and regular jobs that require automation.
We will not get into the details of how to create a automation account in Azure. It is very simple to follow the Microsoft Docs to create an automation account and also learn how to create a runbook and schedule it.
We will now focus on the how-to of using an Azure Service Principal in our PowerShell script.
In this example we will use the Password-based Service Principal for simplicity. Maybe I'll create another post for the certificate based service principal in a later update.
Note: The Service Principal can be used as any other account in Azure. So, you can use it with RBAC across Resource Groups/Resources as might be necessary.
Go to your Automation Account resource and scroll down to find "Credentials" in the left bar. Use the "Add a credential" option to create a new credential in the credential store. Fill in the fields as required. The username is the ID of your service principal and the password is the same what you set during the service principal creation.
You now have your Service Principal credentials stored securely in the Credential Store.
Now, the next step is using this inside your PowerShell script. Now it is important to note the name that we used when creating the credential in the Credential Store.
Here is a sample PowerShell that gets all Resource Groups that the Service Principal has access to.
$credentials = Get-AutomationPSCredential -Name 'PSAutomation Account'
Add-AzureRmAccount -ServicePrincipal -Credential $credentials -TenantId $TenantId

$resourceGroups = Get-AzResourceGroup

if ($resourceGroups) {
    foreach ($ResourceGroup in $resourceGroups) {
        Write-Host $ResourceGroup.ResourceGroupName
    }
}
else {
    Write-Host "User has no access to any resource group"
}
Of course, this can easily be extended to more complex scripts and regular jobs that require automation.


Comments
Post a Comment